HypeSrv
Warning
Due to sharing an IP address with other HypeSrv users (who may also be hosting a Discord bot), you are more likely to encounter rate limits. It should be fine for most use-cases. You can request a dedicated IP-Address for your bot with our support team if you encounter issues.
Installation
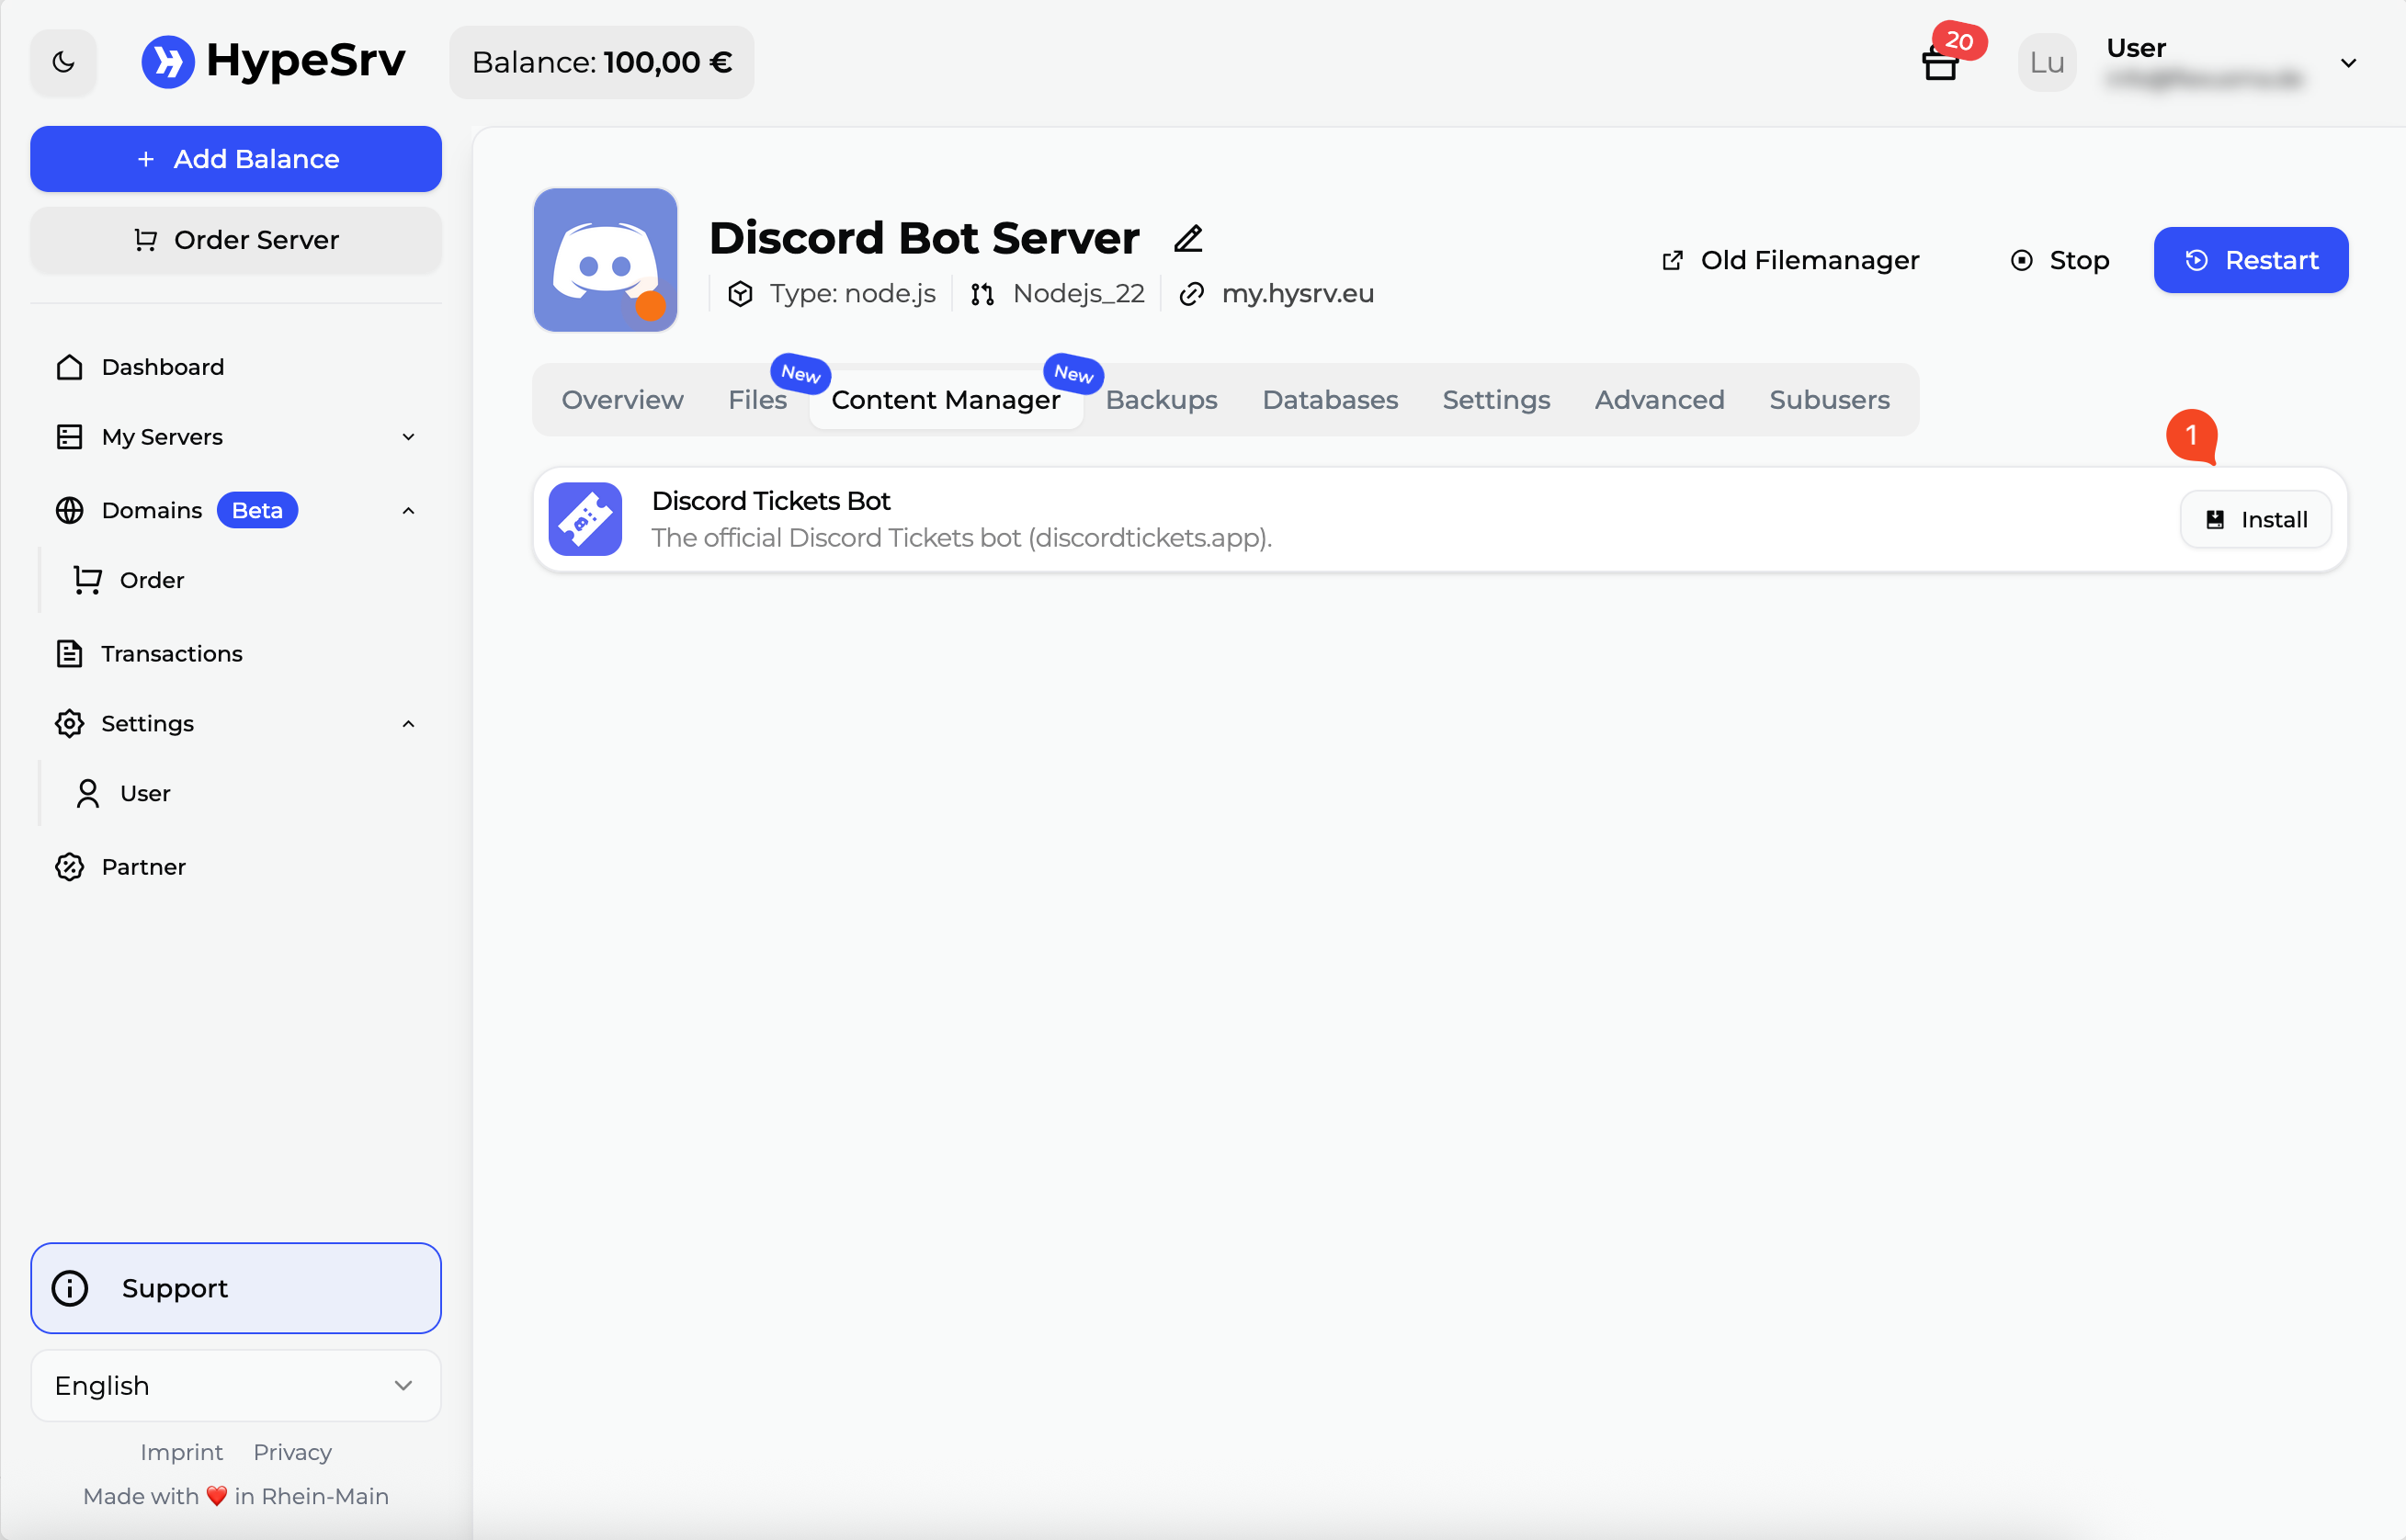
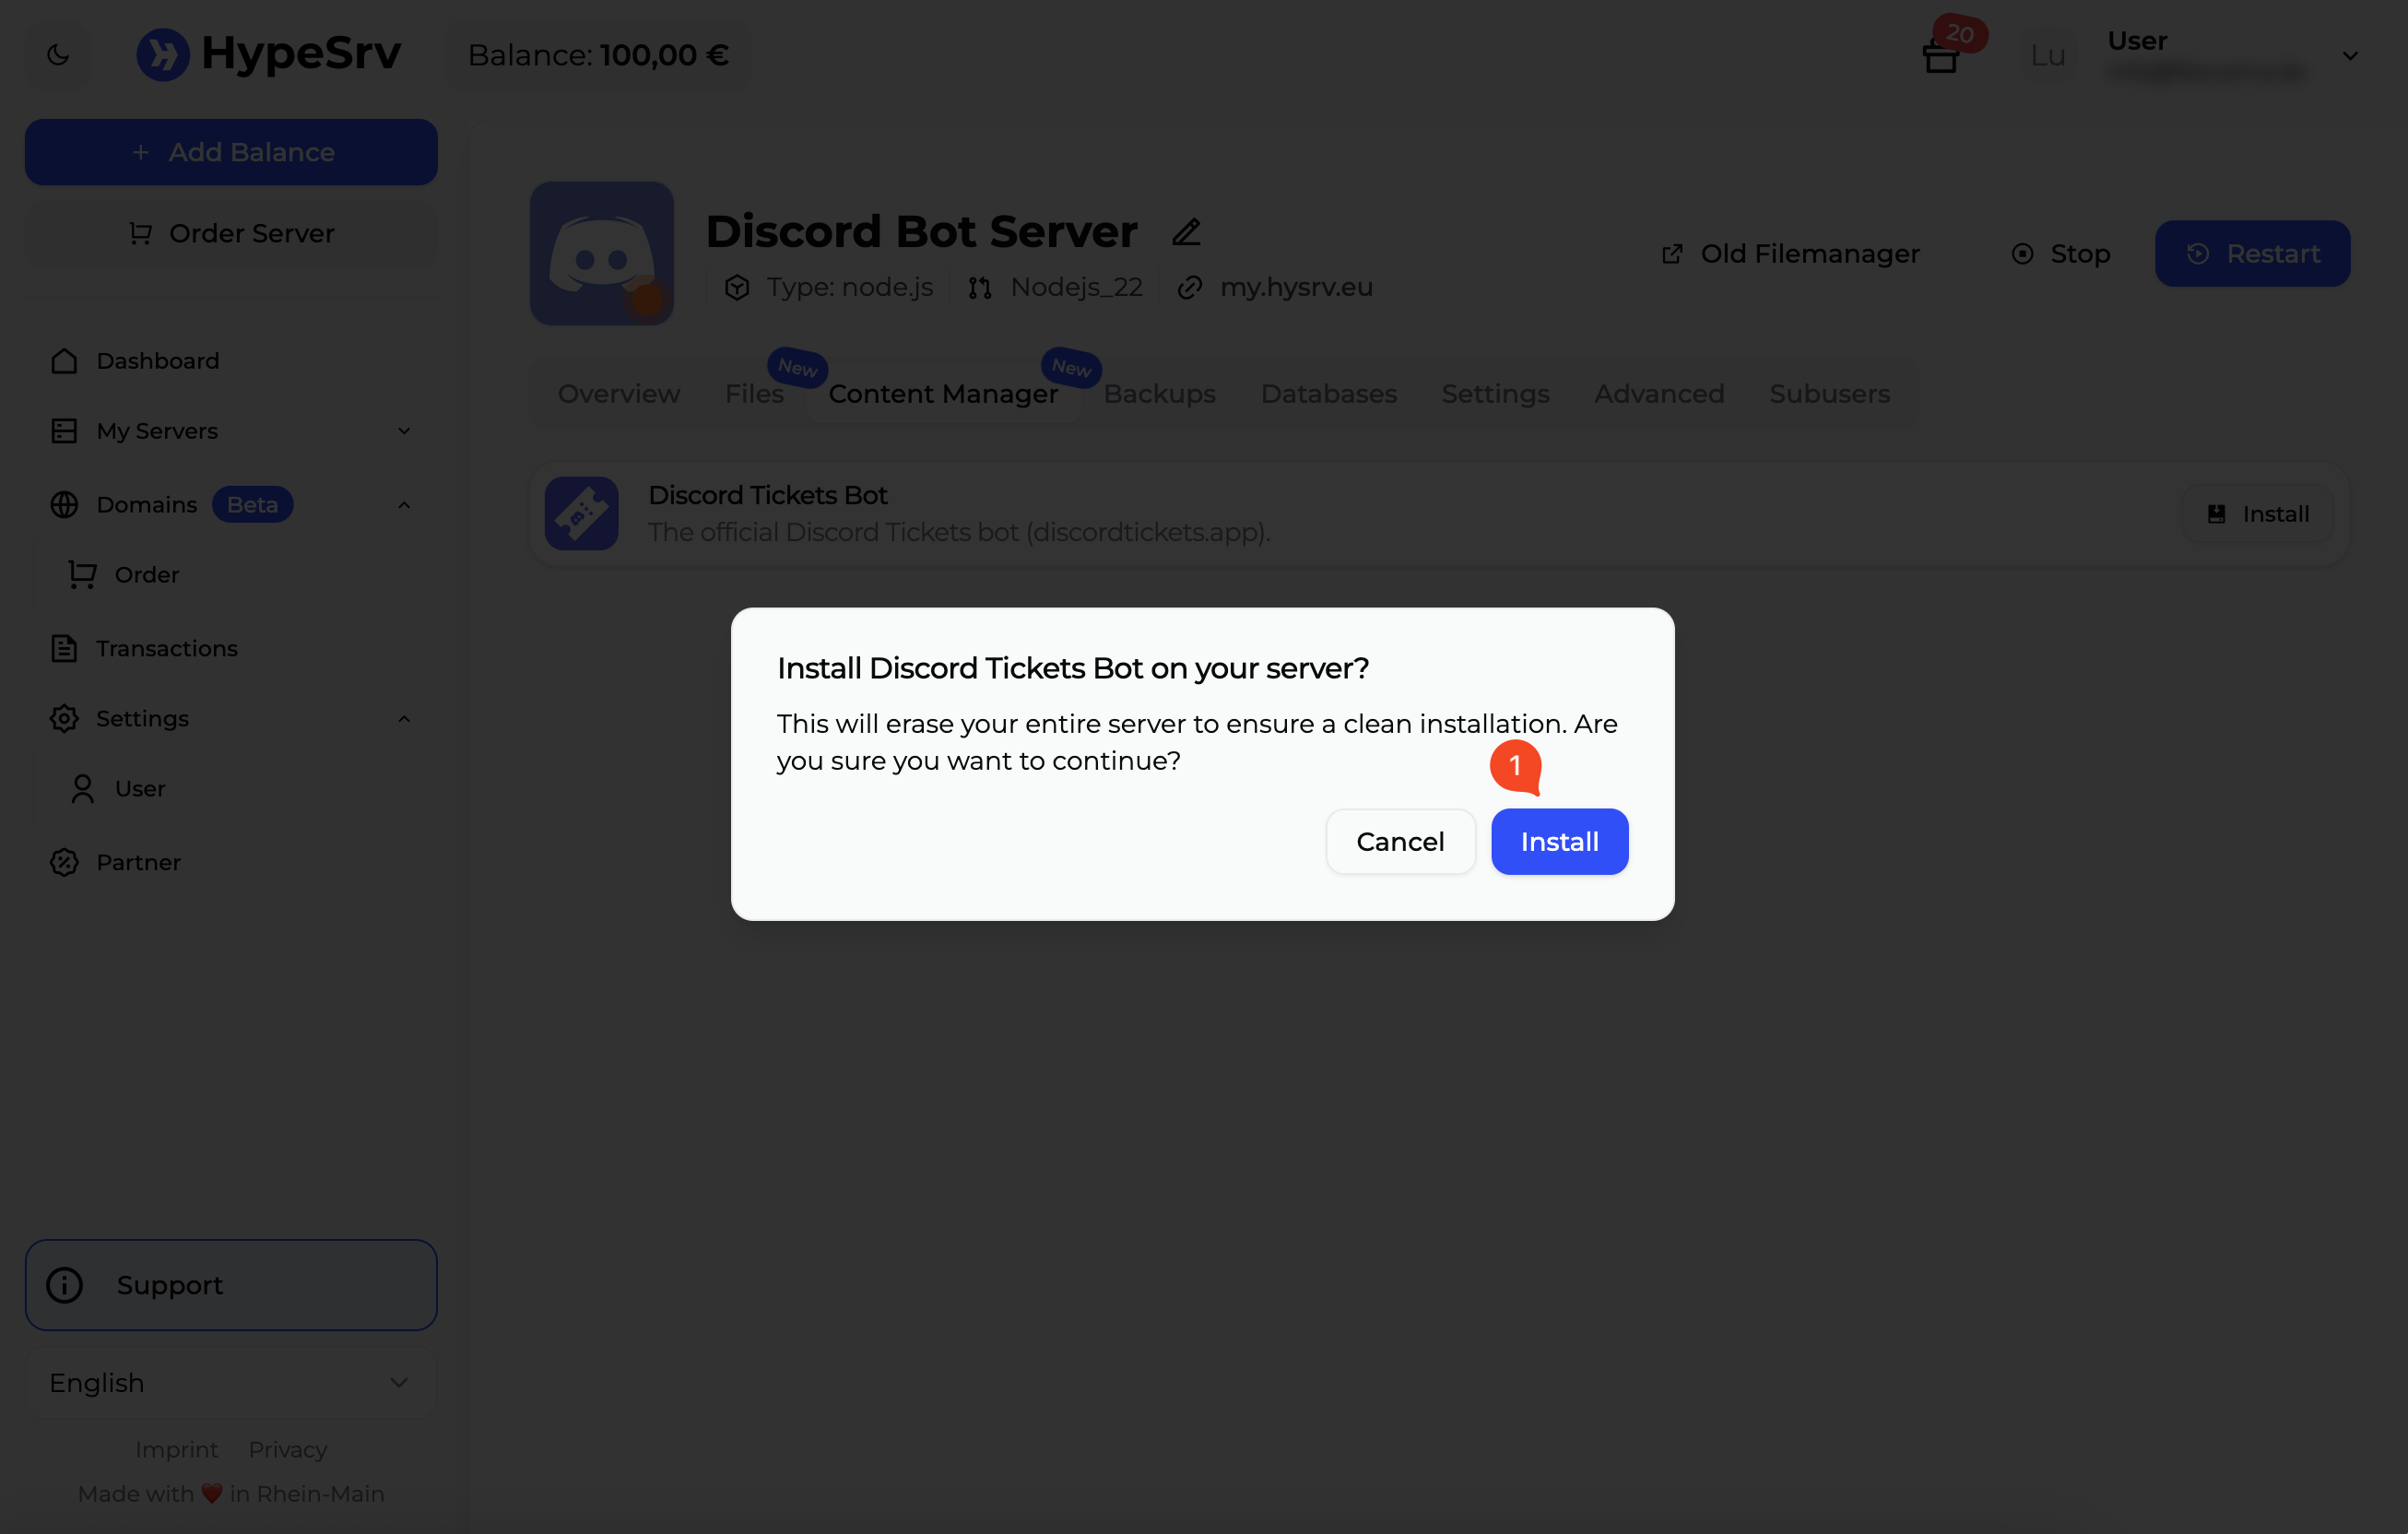
After purchasing your Discord Bot Server, click on Content Manager in your Server Dashboard, then select Discord Tickets Bot and hit install.
Warning
Installing Discord Tickets via the HypeSrv Content Manager will completely WIPE/DELETE all your server-files!
The server will now automatically install Discord Tickets for you.
When it has finished, simply start the server to install the bot dependencies and generate the .env file.
It may take a few minutes to install completely.
Configuration
You can configure your Discord Tickets Bot settings and environment variables via the Advanced Settings Tab in your Server Dashboard.
Creating the Discord application
Warning
Don't skip this section if you already know how to create a Discord application; Discord Tickets requires additional configuration. Using an existing application is not recommended.
-
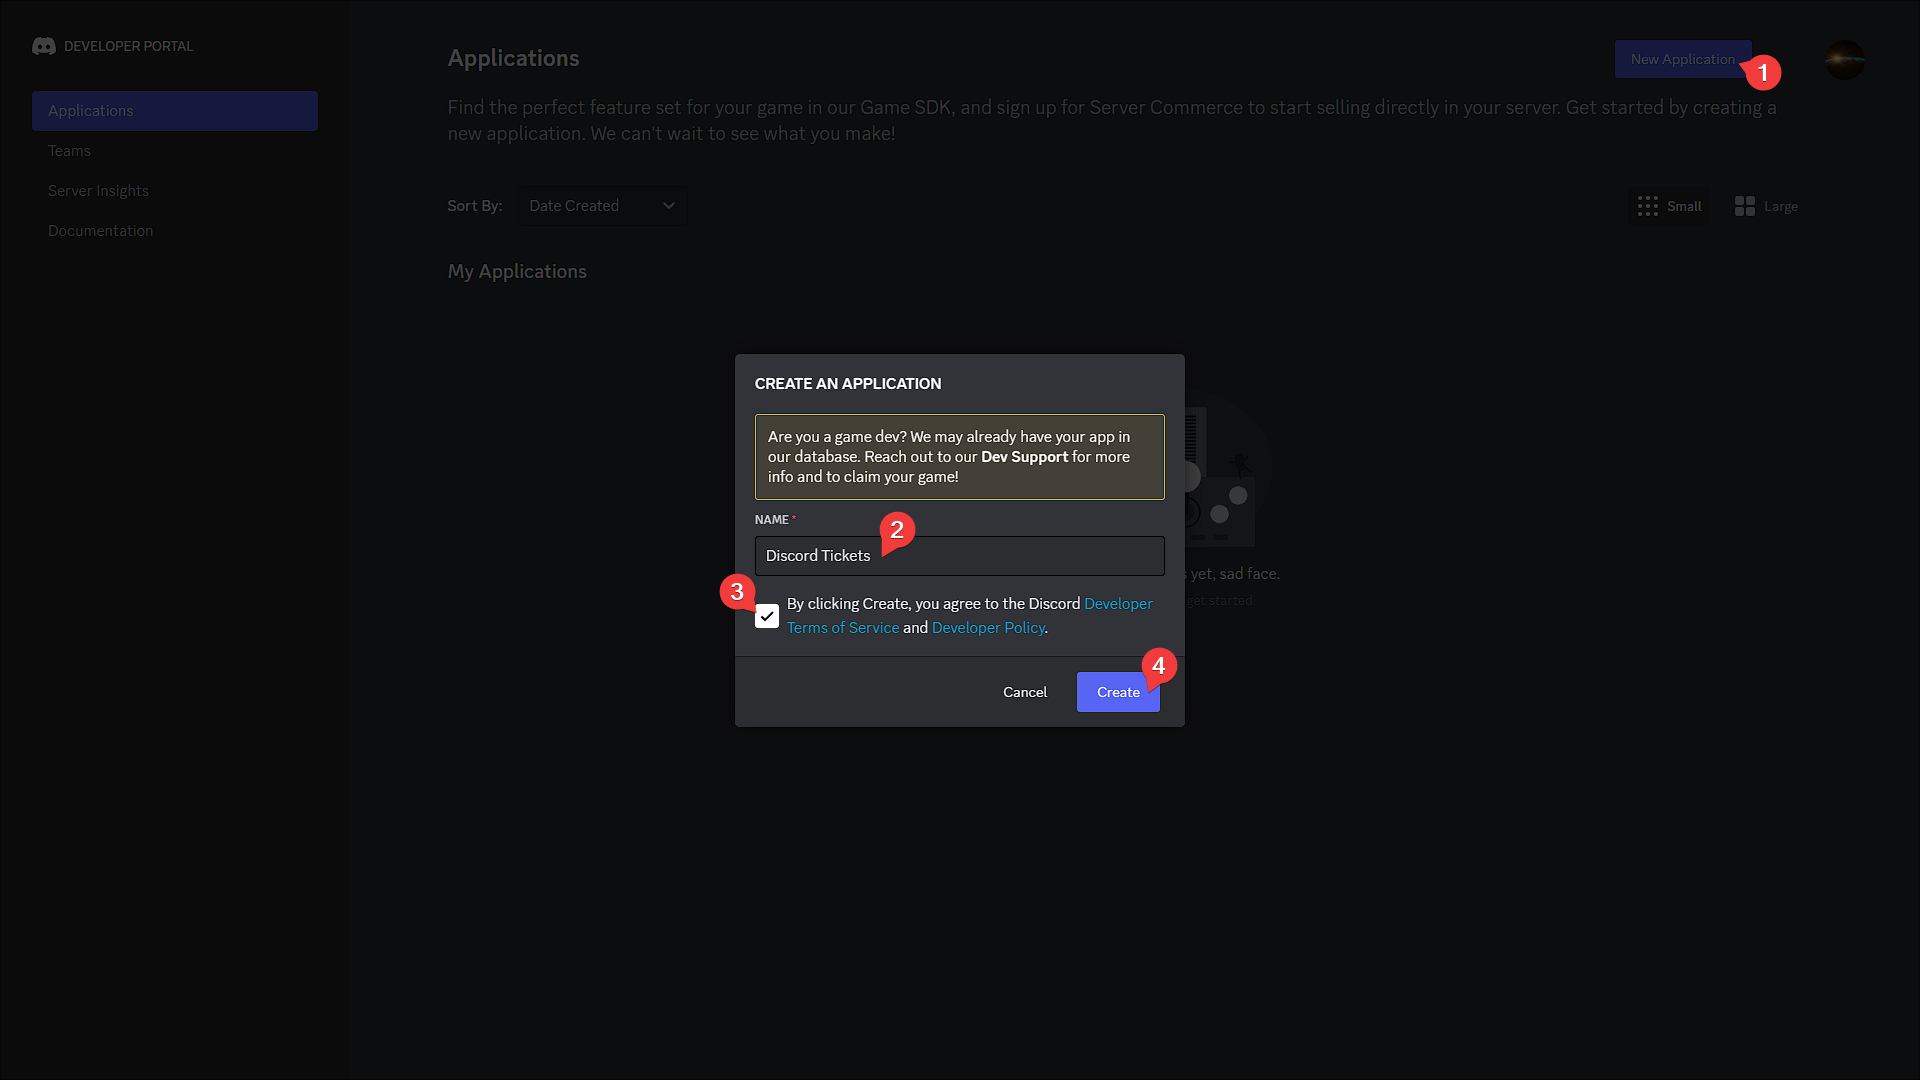
Go to the Discord Developer Portal
-
Create an application
- Click the
New Applicationbutton - Give your application a name, accept the terms of service and click
Create
 3. In the page that appears you can add a logo, description, or links to your terms of service and privacy policy if you wish to, and then click
 Save Changes.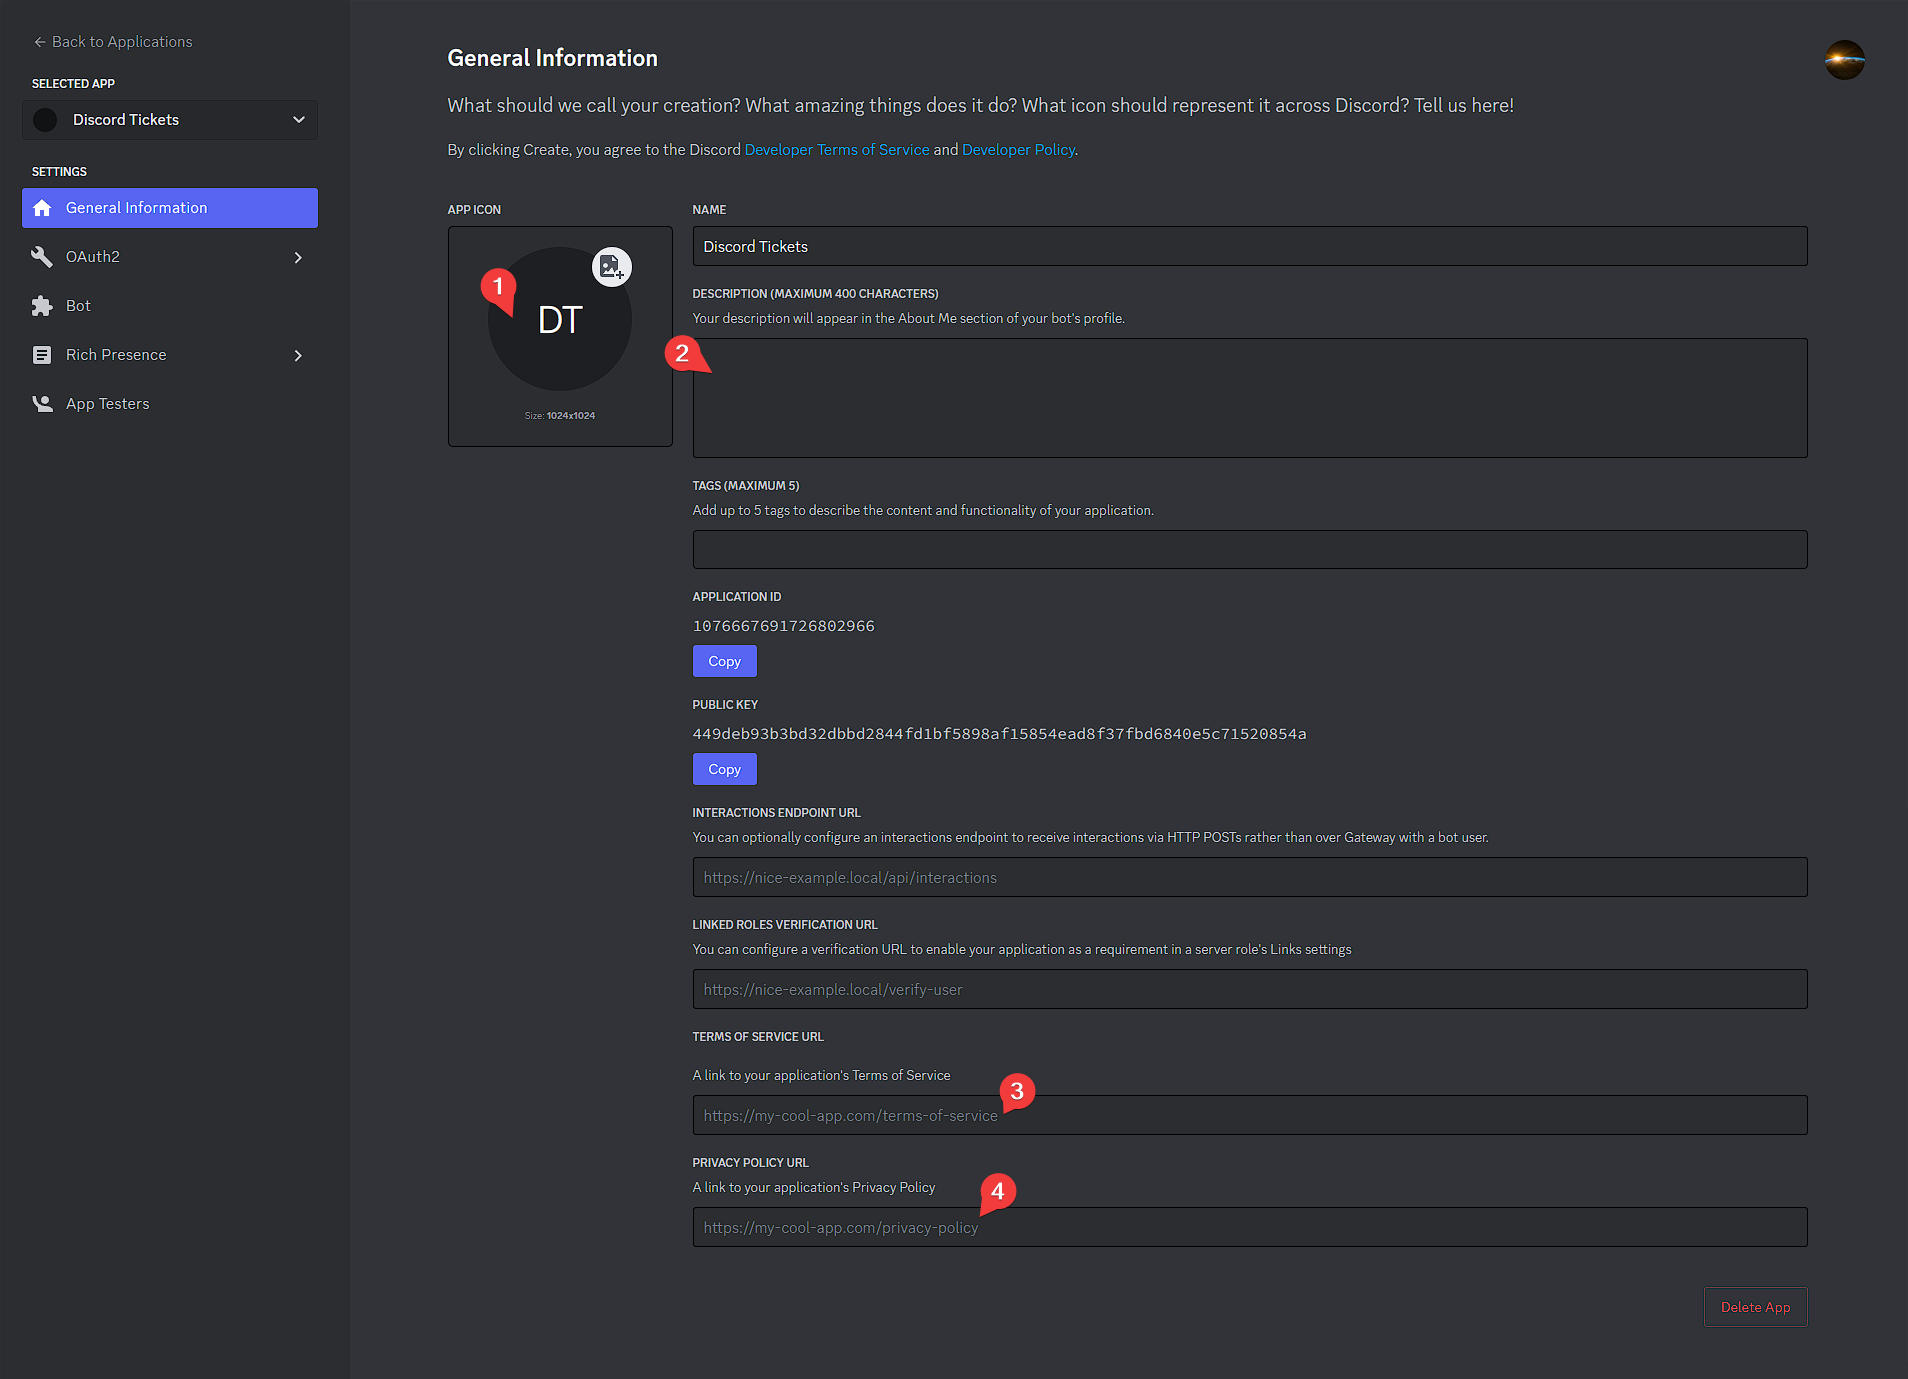
- Click the
-
Go to the
OAuth2page and clickReset Secret, thenYes, do it!. Copy the new secret and set it as yourDISCORD_SECRETenvironment variable. 5. Click
 Add Redirectand enter the value of yourHTTP_EXTERNALenvironment variable, followed by/auth/callback. Then clickSave Changes.Examples
http://12.345.67.89:8080/auth/callbackhttps://tickets.example.com/auth/callback
If you set this to
https://tickets.example.com/auth/callback, yourHTTP_EXTERNALenvironment variable must be set tohttps://tickets.example.com(without a trailing/). 6. Navigate to the
 Botpage- Click
View Token, then copy the token and set it as yourDISCORD_TOKENenvironment variable. - We highly recommend disabling the "Public Bot" option to prevent other people from adding your bot to their servers. Before you can do so, you will need to go to to the
Installationpage and setInstall LinktoNone. After saving changes, return to theBotpage and disable the "Public Bot" option.

- Enable the
presence,server membersandmessage contentintents.

Don't add the bot to your Discord server yet; you'll do that later.
Set Bot Token and Secret
Important
If you do not set these variables, your discord bot won't be able to connect to discord and you won't be able to login to the Bot Web-Panel.
Make sure you enter the Bot Token and Oauth Secret from the discord developer dashboard in the Discord Bot Token and Discord 0Auth2 Secret fields in the Advanced Section of your Server Dashboard!
Database (optional)
Info
You only need to follow this section if you want to use MYSQL as the database backend for your bot.
From toolbar, select Database and create a new database.
Copy the connection details that are displayed and enter them in the Database URL field in the Advanced Section.
Make sure your Database Provider is set to mysql if you do this!
| Example Database URL | |
|---|---|
1 | |
Web server
Your server Port will be automatically routed to the Bot Web-Panel. You can simply visit the server URL in your browser.
Reverse proxy
If you have a domain name, feel free to setup your reverse proxy yourself or contact our support-team should you require assistance. Please understand that we can only offer limited support for external, customer managed deployments.
Set the Trust proxies? variable to true in the Advanced Settings of your server and (optionally) change HTTP_EXTERNAL accordingly (e.g. https://tickets.example.com).
Publishing the commands
If using the Content Manager installation, your bot will automatically publish the commands by default.
If you still want to manually publish them you can do the following:
Start the server and wait until you see "Connected to Discord".
Then type commands publish into the bot's console to publish the commands to Discord.
Next steps
If your bot is running, congratulations, you have successfully installed Discord Tickets, and now it's time to set it up in your Discord server.
Join the community on Discord and get notified when updates (with new features and fixes) are released.
Refer to the configuration guide for a step-by-step guide on how to add and configure the bot in your server.
Having trouble?
If you haven't got the bot running yet and need help, you can ask for help on Discord or on GitHub.