Docker
This guide is written for Linux systems. The process is similar on Windows, but the commands may differ.
Before you start, you need to make sure your system meets the requirements.
Unless you know what you're doing and already have a database and reverse proxy set up,
using the provided docker-compose.yml file is recommended over pure Docker.
Docker Compose
The default configuration contains two services:
- Discord Tickets
- MySQL
Start by making a directory(1) and downloading the docker-compose.yml file from GitHub.
- The name isn't important, but
tickets-botis used as an example in this guide.
mkdir tickets-bot && cd tickets-bot
wget https://dl.discordtickets.app/bot/docker-compose.yml
curl -O -L https://dl.discordtickets.app/bot/docker-compose.yml
You can also download the file in your browser.
Environment variables
Open docker-compose.yml in your preferred text editor(1) and modify the highlighted lines.
-
nano docker-compose.yml
Bug
The value of HTTP_EXTERNAL must be resolvable both from within the container and the host,
which means when HTTP_EXTERNAL is an internal address (e.g. http://127.0.0.1), the container and host ports must be the same.
This is because the SvelteKit application uses server-side rendering, so the bot makes HTTP requests to itself.
Alternatively, you can set the HTTP_INTERNAL value with a different port.
If you are using a reverse proxy and a domain name, this shouldn't be a problem.
Tip
You can middle-click on links to open them in a new tab so you can easily come back to the documentation!
Refer to the configuration documentation for more information about the available environment variables, and return to this page when you have finished.
| docker-compose.yml | |
|---|---|
1 2 3 4 5 6 7 8 9 10 11 12 13 14 15 16 17 18 19 20 21 22 23 24 25 26 27 28 29 30 31 32 33 34 35 36 37 38 39 40 41 42 43 44 45 46 47 48 49 50 51 52 53 54 55 56 57 58 | |
- Change the password for the database user to something secure. This isn't vital if you are not exposing the database to the network, but note that it can't be changed after the container is created.
- Change the password for the root database user to something secure. This isn't vital if you are not exposing the database to the network, but note that it can't be changed after the container is created.
- Make sure the image tag is the latest version. Discord Tickets follows semantic versioning, but not strictly, so pinning to a minor version is recommended. You can see all available tags on Docker Hub.
- Change
insecureto the value ofMYSQL_PASSWORD. - Refer to Creating the Discord application.
- Refer to Creating the Discord application.
- Copy the value from the encryption key generator below.
- Change this to your server's external IP address, or a domain name that points to it.
- If you are using a reverse proxy, set this to
true. - You can add more users by separating them with commas (e.g.
319467558166069248,123456789012345678) - If the container's timezone doesn't match the host (e.g. because it is a Windows host), you can uncomment and change the TZ variable.
Creating the Discord application
Warning
Don't skip this section if you already know how to create a Discord application; Discord Tickets requires additional configuration. Using an existing application is not recommended.
-
Go to the Discord Developer Portal
-
Create an application
- Click the
New Applicationbutton - Give your application a name, accept the terms of service and click
Create
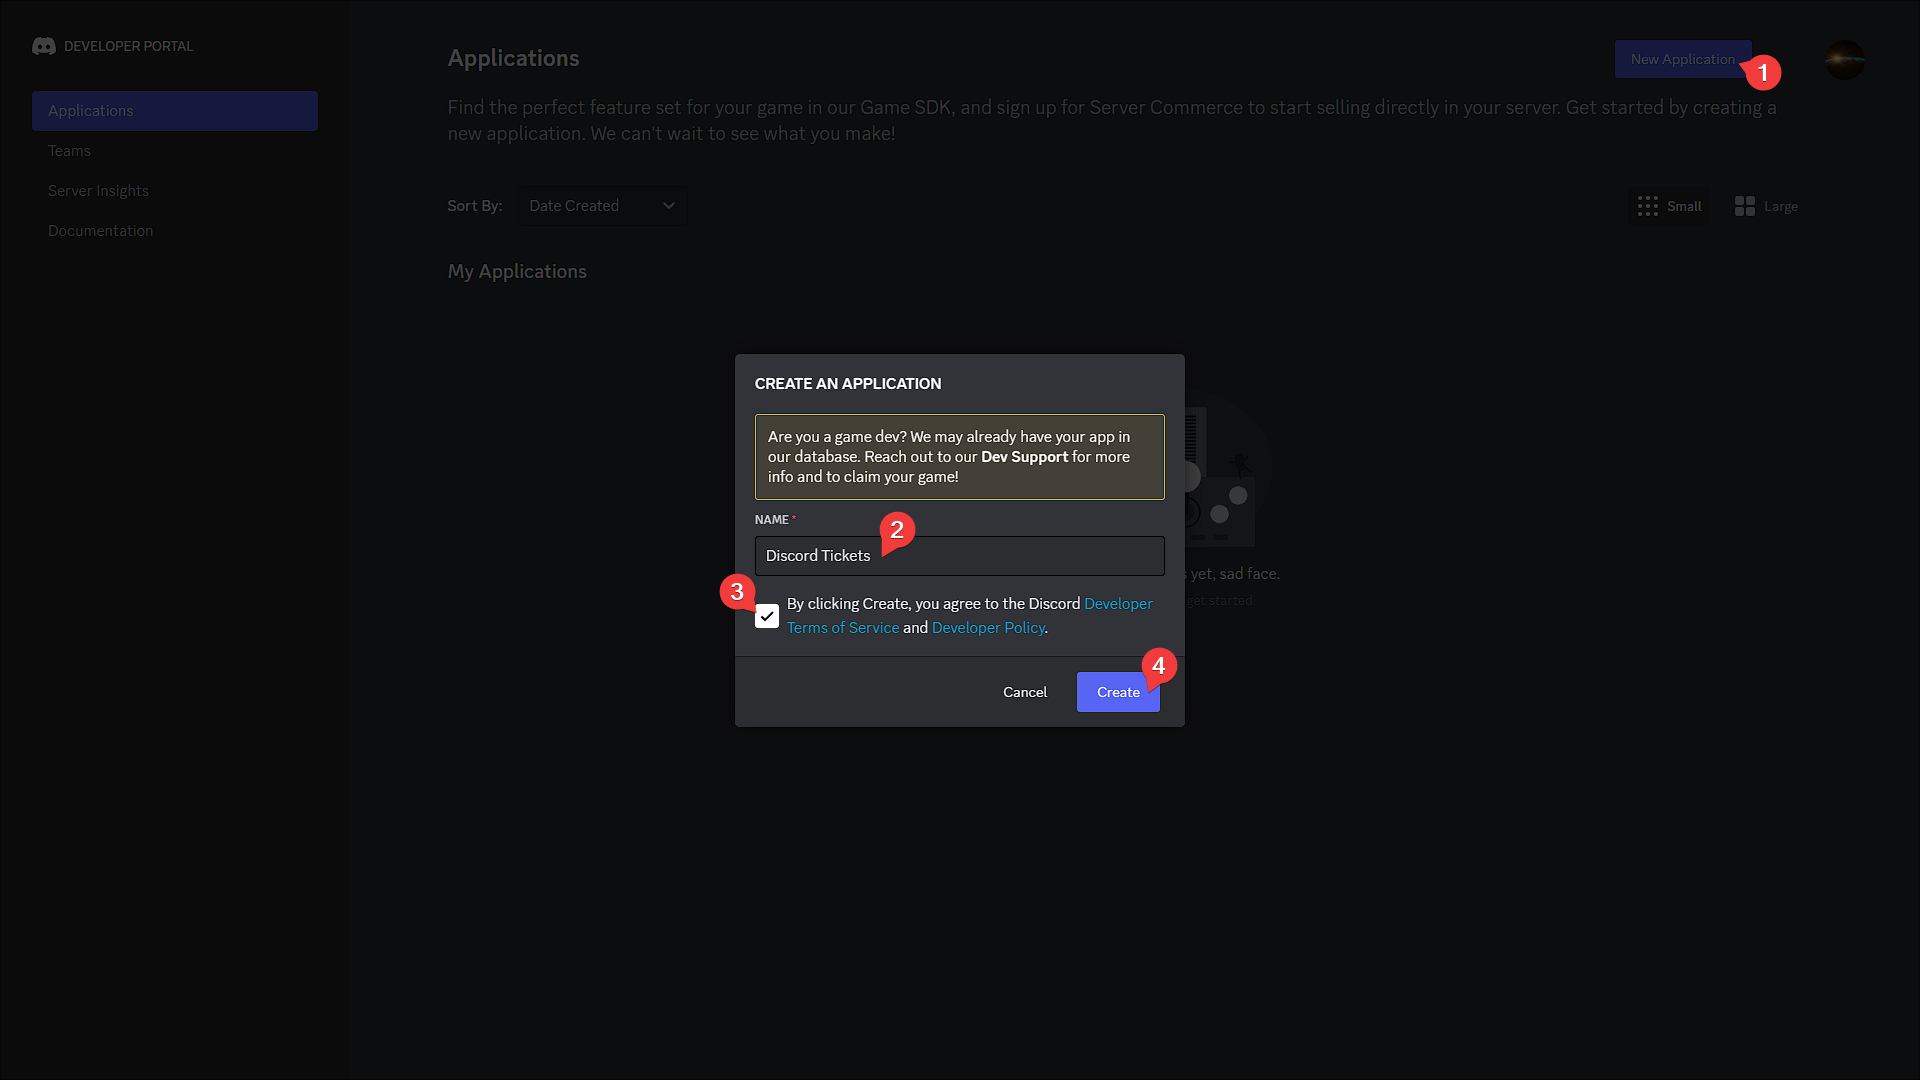 3. In the page that appears you can add a logo, description, or links to your terms of service and privacy policy if you wish to, and then click
 Save Changes.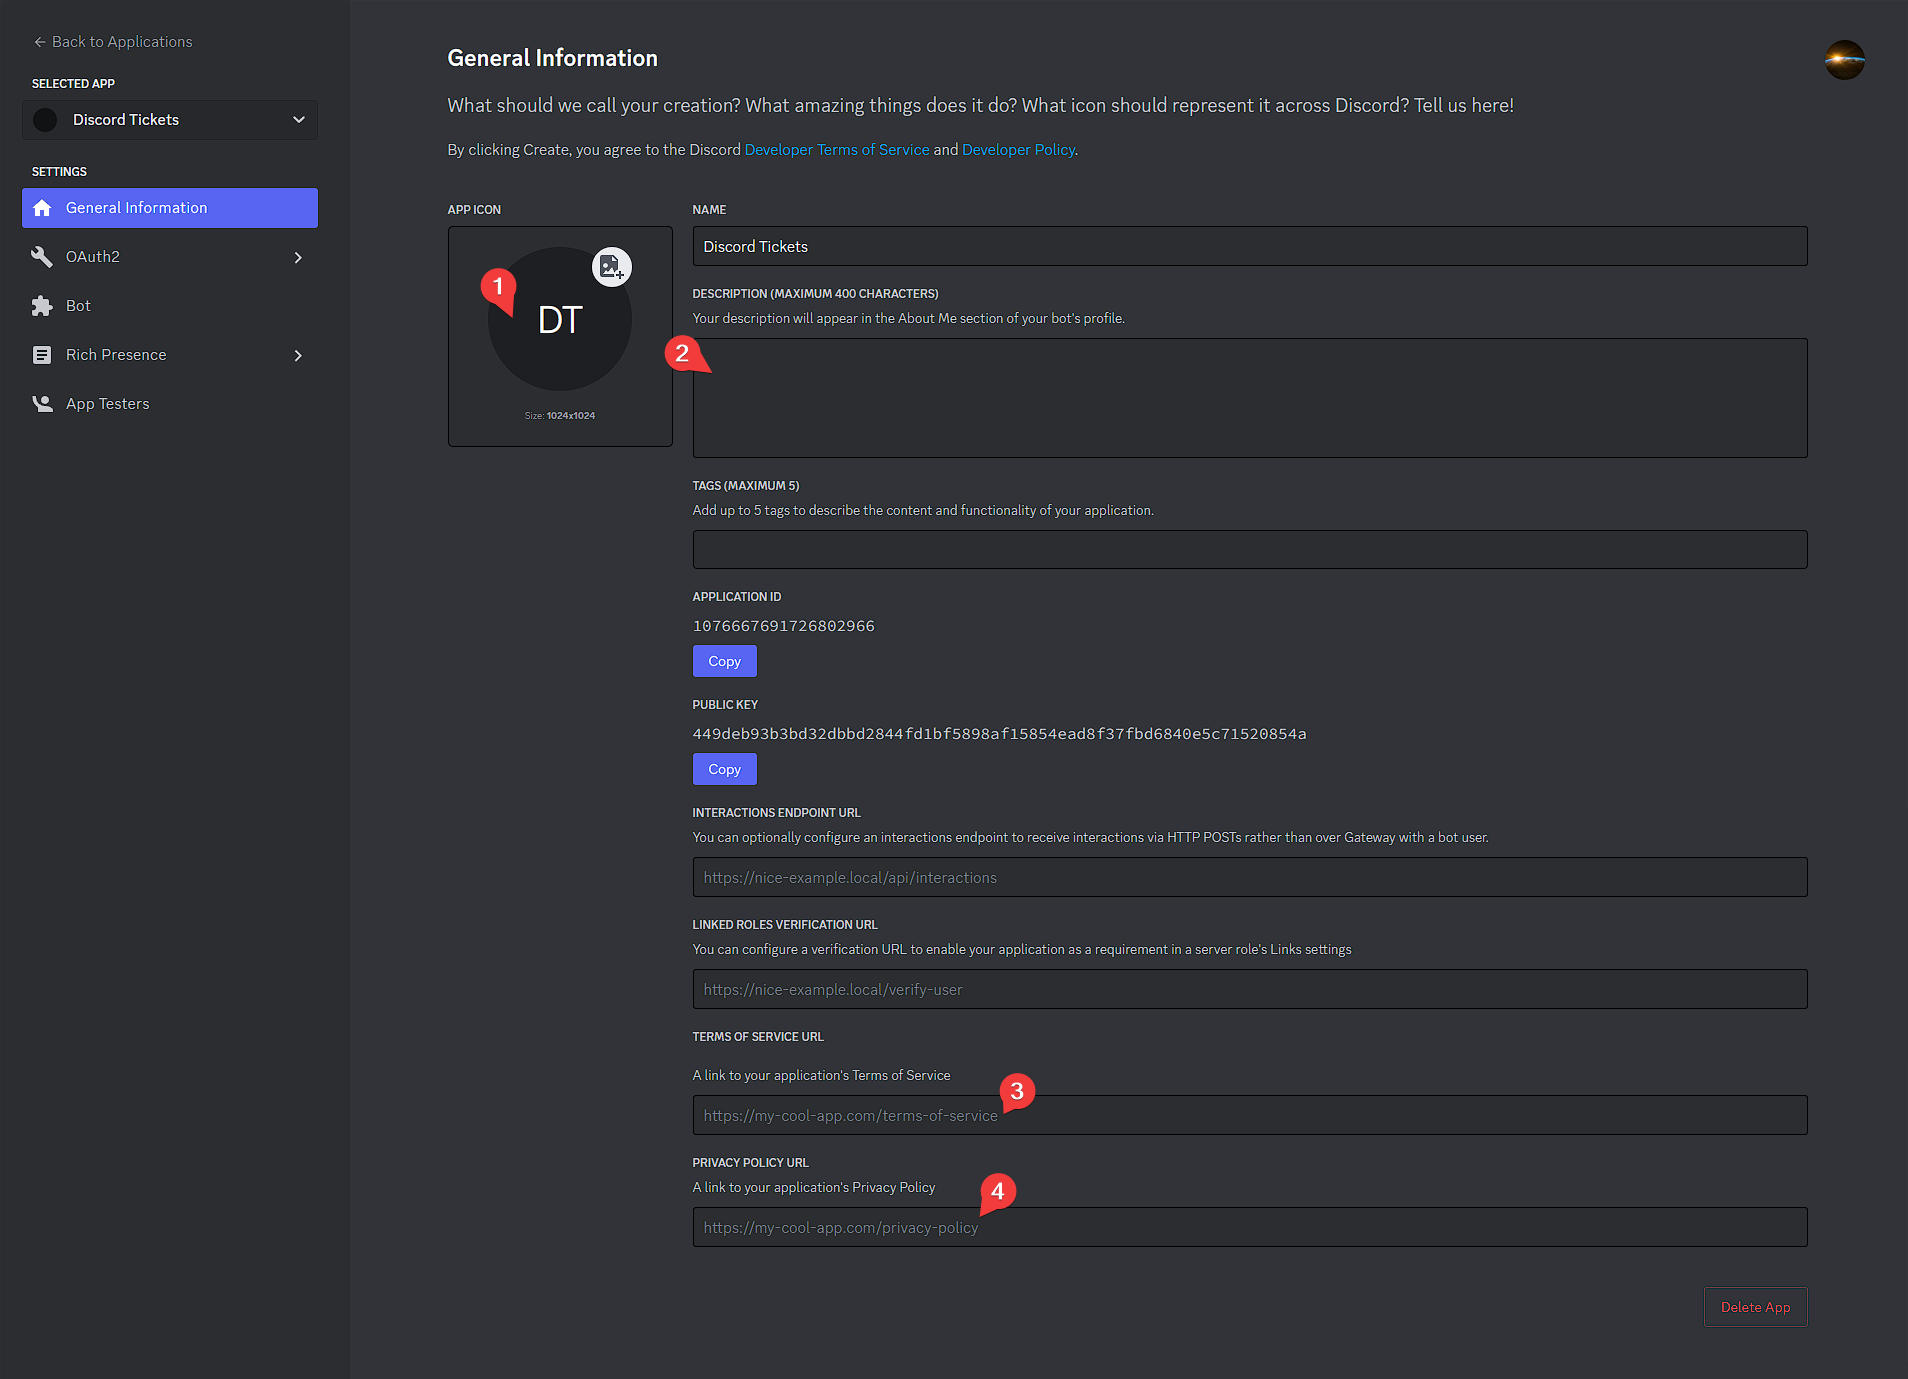
- Click the
-
Go to the
OAuth2page and clickReset Secret, thenYes, do it!. Copy the new secret and set it as yourDISCORD_SECRETenvironment variable. 5. Click
 Add Redirectand enter the value of yourHTTP_EXTERNALenvironment variable, followed by/auth/callback. Then clickSave Changes.Examples
http://12.345.67.89:8080/auth/callbackhttps://tickets.example.com/auth/callback
If you set this to
https://tickets.example.com/auth/callback, yourHTTP_EXTERNALenvironment variable must be set tohttps://tickets.example.com(without a trailing/). 6. Navigate to the
 Botpage- Click
View Token, then copy the token and set it as yourDISCORD_TOKENenvironment variable. - We highly recommend disabling the "Public Bot" option to prevent other people from adding your bot to their servers. Before you can do so, you will need to go to to the
Installationpage and setInstall LinktoNone. After saving changes, return to theBotpage and disable the "Public Bot" option.

- Enable the
presence,server membersandmessage contentintents.

Don't add the bot to your Discord server yet; you'll do that later.
Encryption key
Copy the value below and set it as the ENCRYPTION_KEY environment variable.
Click to regenerate
|
|
Starting the bot
Start the containers:
docker compose up -d
Danger
In case of errors such as EACCES: permission denied.. after running the docker container, comment out the first volume in docker-compose.yml.
Before:
| docker-compose.yml | |
|---|---|
1 2 | |
After:
| docker-compose.yml | |
|---|---|
1 2 | |
Then restart the container:
1 | |
Publishing the commands
First, find the bot container's ID:
docker container ls
1 2 3 | |
Then, attach to the container:
docker attach 318bb11719d9
You can now interact with the bot's console and publish the commands to Discord:
commands publish
To disconnect from the container, press Ctrl+P Ctrl+Q. If that doesn't work (e.g. if you using the terminal in VS Code), press Ctrl+C instead (which will also restart the bot).
Reverse proxy
If you have a domain name, you should set up a reverse proxy with SSL/TLS
and set the HTTP_TRUST_PROXY environment variable to true.
Next steps
If your bot is running, congratulations, you have successfully installed Discord Tickets, and now it's time to set it up in your Discord server.
Join the community on Discord and get notified when updates (with new features and fixes) are released.
Refer to the configuration guide for a step-by-step guide on how to add and configure the bot in your server.
Having trouble?
If you haven't got the bot running yet and need help, you can ask for help on Discord or on GitHub.
Pure Docker
This is a very short overview; refer to the Docker Compose guide for more information.
Some required environment variables that you are unlikely to change have defaults set in the Dockerfile:
| Name | Value |
|---|---|
HTTP_HOST |
0.0.0.0 |
HTTP_PORT |
80 |
You need to set the other required environment variables.
Tip
You can middle-click on links to open them in a new tab so you can easily come back to the documentation!
Refer to the configuration documentation for more information about the available environment variables, and return to this page when you have finished.
| Example | |
|---|---|
1 2 3 4 5 6 7 8 9 10 11 | |
The first time you start the container, don't use the -d flag so you can type commands publish in the console to publish the commands to Discord.
You can then restart the container in detached mode.
Alternatively, set the PUBLISH_COMMANDS environment variable to true to publish commands automatically at startup.